Kubernetes Best Practices
Table of contents
- Intro
- Before to start
1.1 12 Factor
1.2 Lint your manifests
1.3 Liveness readiness
1.4 Scan container images
1.5 Do not use root user in your containers - Security
2.1 Use Pod Security Policies
2.2 Upgrade to the Latest Version
2.3 Enable Role-Based Access Control (RBAC)
2.4 Separate Sensitive Workloads
2.5 Encrypt secrets at rest - Monitor
3.1 Turn on Audit Logging
3.2 Tools - Configs
4.1 Limits (CPU/memory)
4.2 Specify pod anti-affinity
4.3 Pod disruption budget (PDB)
4.4 Use Namespaces and Labels
4.5 Network Policies - References
0. Intro
By 2022, Gartner predicts that
“more than 75 percent of global organizations will be running containerized applications in production, which is a significant increase from fewer than 30 percent today" [1].
The Capital One breach from July (https://edition.cnn.com/2019/07/29/business/capital-one-data-breach/index.html) is just the latest in a long line of security incidents that can trace their success back to a misconfigured infrastructure or security setting. As organizations accelerate their use of containers and Kubernetes and move their application development and deployment to cloud platforms, preventing avoidable misconfigurations in their environment becomes increasingly crucial.
Now you know why i've writed these Kubernetes best practices.
1. Before to start
I've called "before to start" every best practice (of course that i know) that is related to the software development culture.
1.1 "12-factor"[2]
In general, following the twelve-factor app recommendations (https://12factor.net/) for your application is considered good practice. 12 factor app was writed on 2011 by Adam Wiggins.
Ex.
- Handle sigterm signal to gracefully stop a worker sending a NACK signal (to rabbitMQ for example).
1.2 Lint your manifests[2]
YAML is a tricky format. You should use YAML extension for VScode, because it supports multi-documents in a single file.
You can also use Kubernetes-specifics linters, such as:
- kube-score lints your manifests and enforce good practices (https://kube-score.com/)
$ kube-score score my-app/*.yaml
[CRITICAL] Pod Probes
  · Container is missing a readinessProbe
    Without a readinessProbe Services will start sending traffic to
    this pod before it's ready
  · Container is missing a livenessProbe
Without a livenessProbe kubelet can not restart the Pod if it has crashed- kubeval also lints the manifests, but only checks validity (https://kubeval.instrumenta.dev/).
$ kubeval my-invalid-rc.yaml
WARN - fixtures/my-invalid-rc.yaml contains an invalid ReplicationController - spec.replicas: Invalid type. Expected: [integer,null], given: string
$ echo $?
1
Also, in Kubernetes 1.13, you can use the --dry-run option appeared on kubectl which lets Kubernetes check your manifests without applying them. You can use this feature to check if your YAML files are valid for Kubernetes.
The --dry-run k8s feature is like nginx -t in order to check the Nginx configs validity before apply them.
1.3 Liveness readiness[2]
Liveness and readiness are ways for an application to communicate its health to Kubernetes. Configuring both helps Kubernetes handle your pods correctly, and react accordingly to state change.
The liveness probe is here to assess whether if a container is still alive; meaning, if the container is not in a broken state, a deadlock, or anything similar. From there, it can take decisions such as restarting it.
The readiness probe is here to detect if a container is ready to accept traffic, block a rollout, influence the Pod Disruption Budget (PDB), etc. It’s particularly useful when your container is set to receive external traffic by Kubernetes (most of the time, when it’s an API).
Usually, having the same probe for readiness and liveness is acceptable. In some cases though, you might want them to be different. A good example is a container running a single-threaded application that accepts HTTP calls (like PHP). Let’s say you have an incoming request that takes a long time to process. Your application can’t receive any other request, as it’s blocked by the incoming requests; therefore it’s not “ready”. On the other hand, it’s processing a request, therefore it’s “alive”.
Another thing to keep in mind, your probes shouldn’t call dependent services of your application. This prevents cascading failure.
The common API pattern is to add a new HTTP route like /_/healthz. The route of /_/ is used by convention because it is unlikely to clash with existing routes for your project.
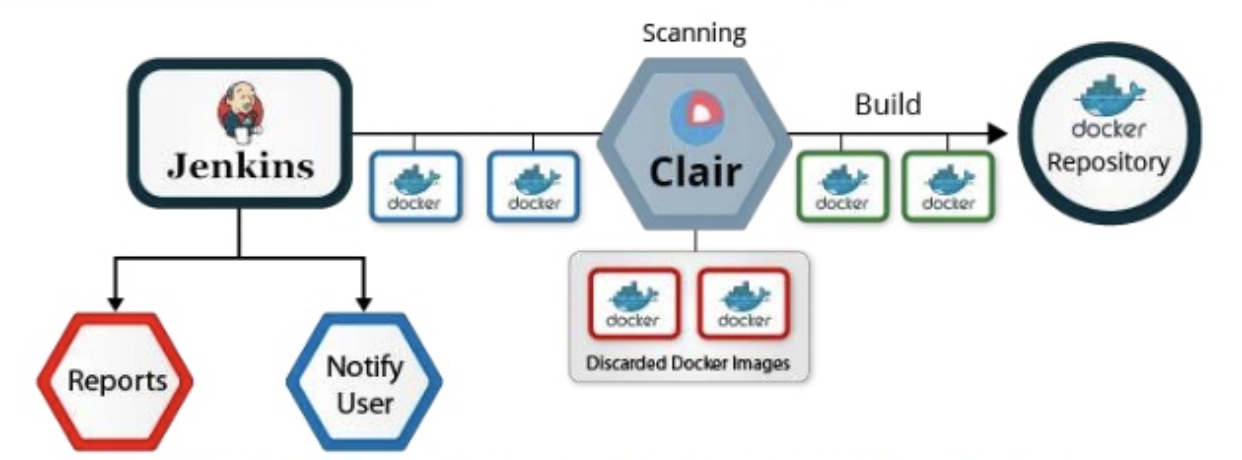
1.4 Scan container images [6]
Avoid using container images from public repositories like DockerHub, or at least only use them if they’re from official vendors like Ubuntu or Microsoft. A better approach is to use the Dockerfile definition instead, build the image, and publish it in your own private image repository where you have more control. But even though you can build your own container images, make sure you include tools like Clair or MicroScanner to scan containers for potential vulnerabilities.
1.5 Do not use root user in your containers[2]
The container paradigm, and the way it’s implemented on Linux, wasn’t built with security in mind. It only exists to restrict resources, such as CPU and RAM, like the documentation of Docker explains. This implies that your container shouldn’t use the “root” user to run commands. Running a program in a container is almost the same as running a program on the host itself.
Thus, add those lines on all your images to make your application run with a dedicated user. Replace “appuser” with a name more relevant for you.
ARG USER=appuser # set ${USER} to be appuser
addgroup -S ${USER} && adduser -S ${USER} -G ${USER} # adds a group and a user of it
USER ${USER} # set the user of the container
WORKDIR /home/${USER} # set the workdir to be the home directory of the user
This can also be ensured at the cluster level with pod security policies.
2. Security
Security isn’t an afterthought or something you remember to do after you deploy an insecure cluster. You don’t, for example, build a house, move all of your belongings into it, and then put locks on the door.[7]
2.1 Use Pod Security Policies
PodSecurityPolicy is a cluster-level resources available in Kubernetes (via kubectl) that is highly recommended because it prevents risky containers/Pods from being used.
The most common usage is to isolate namespace as in the below figure.

apiVersion: networking.k8s.io/v1
kind: NetworkPolicy
namespace: foo
metadata:
  name: deny-from-other-namespaces
spec:
  podSelector:
    matchLabels:
  ingress:
  - from:
    - podSelector: {}
For the full security policy documentation see https://kubernetes.io/docs/concepts/policy/pod-security-policy/
2.2 Upgrade to the Latest Version[4]
Upgrades and support can become more difficult the farther behind you fall, so plan to upgrade at least once per quarter.
For each public vulnerability, the CVE (Common Vulnerabilities and Exposures) site (https://www.cvedetails.com/vulnerability-list/vendor_id-15867/product_id-34016/Kubernetes-Kubernetes.html) has a score that tells you how bad the vulnerability that will make you think to upgrade.
When a CVE is released and proof of concept code is made publicly available, tool suites such as Metasploit quickly include the exploits in their standard kit. Anyone with the skill to copy and paste commands from the Internet can find themselves in control of your systems.

Ex. The attackers exploited the fact that the particular Kubernetes console wasn’t password protected, allowing them to access one of the pods that included access credentials for Tesla’s larger AWS environment.
If you’re using a managed version from cloud vendors, some of them deal with the upgrade for you. If not, Google published a post (https://cloud.google.com/blog/products/gcp/kubernetes-best-practices-upgrading-your-clusters-with-zero-downtime) with a few recommendations on how to upgrade the cluster with no downtime independently from the cloud provider.
As written inside the Google post, there are mainly two ways to upgrade your cluster:
1. Rolling Update
As we do with pods, we can do rolling updates to upgrade Kubernetes nodes.
For each node of the cluster to upgrade:
- is drained (drain node in preparation for maintenance);
- is cordoned (mark node as unschedulable);
- is deleted;
- a new node is created, once that node is up and running go to the point 1. with the next node.
2. Migration with node pools
Instead of upgrading the “active” node pool as you would with a rolling update, you can create a fresh node pool, wait for all the nodes to be running, and then migrate workloads over one node at a time.
Now that we know the strategies of how to upgrade a generic Kubernetes cluster (on-premise/cloud) , let's see how it works on Azure AKS [8].
// check available upgrades
az aks get-upgrades --resource-group myResourceGroup --name myAKSCluster --output table
// output
Name     ResourceGroup     MasterVersion    NodePoolVersion    Upgrades
-------  ----------------  ---------------  -----------------  ---------------
default  myResourceGroup   1.12.8           1.12.8             1.13.9, 1.13.10
// upgrade!
az aks upgrade --resource-group myResourceGroup --name myAKSCluster --kubernetes-version 1.13.10So with the command above, Azure automatically does upgrade using node pools strategy.
You can find more details here -> https://docs.microsoft.com/bs-latn-ba/Azure/aks/upgrade-cluster
2.3 Enable Role-Based Access Control (RBAC) [4]
Once RBAC (Role-based access control) is being enforced, you still need to use it effectively. Cluster-wide permissions should generally be avoided in favor of namespace-specific permissions (https://kubernetes.io/docs/reference/access-authn-authz/rbac/).
On Azure you need to combine Azure Active Directory with Kubernetes RBAC in order to give granular access to a specific users group.
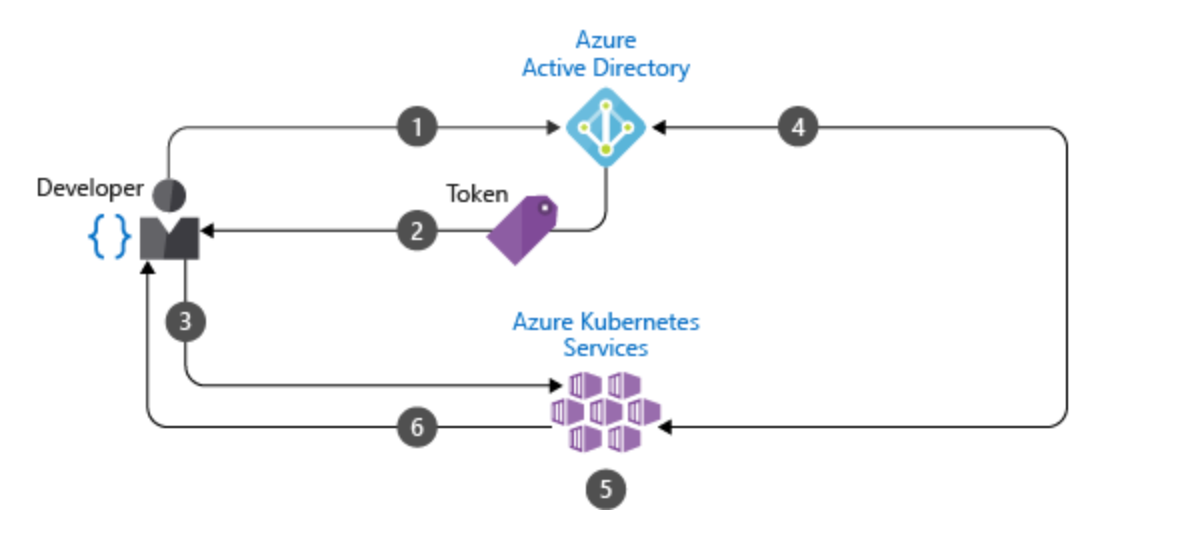
The access management should be thinked using the principle of least privilege (https://en.wikipedia.org/wiki/Principle_of_least_privilege)
2.4 Separate Sensitive Workloads [4]
To limit the potential impact of a compromise, it’s best to run sensitive workloads on a dedicated set of machines.
You can achieve this separation using node pools (in the cloud or on-premises) and Kubernetes namespaces, taints, tolerations, and other controls.
2.5 Encrypt secrets at rest [5]
If an attacker has control of etcd, they can do whatever they want—such as revealing secrets for database passwords or accessing sensitive information. Since Kubernetes 1.13, you can enable encryption at rest. Backups will be encrypted, and attackers won’t be able to decrypt the secrets without the master key.
3. Monitor
3.1 Turn on Audit Logging [4]
Make sure you have audit logs enabled and are monitoring them for anomalous or unwanted API calls, especially any authorization failures — these log entries will have a status message “Forbidden.” Authorization failures could mean that an attacker is trying to abuse stolen credentials.
In Kubernetes, you can create audit policies to decide at which level and what things you’d like to log each time the Kubernetes API is called.
3.2 Tools
Use a log aggregation tool such as EFK stack (Elasticsearch, Fluentd, Kibana), DataDog, Sumo Logic, Sysdig, GCP Stackdriver, Azure Monitor, AWS CloudWatch.
4. Configs
4.1 Limits (CPU/memory)
Kubernetes lets you configure “requests” and “limits” of the resources for pods (CPU, RAM and disk). Configuring the “requests” helps Kubernetes schedule your pods more easily, and better pack workloads on your nodes.
Most of the time you could define "request" = "limit". But be careful, as your pod will be terminated if it goes above the limit.
Unless your applications are designed to use multiple cores, it is usually a best practice to keep the CPU request at "1" or below.
4.2 Specify pod anti-affinity
When you deploy an application with a lot of replicas, you most probably want them to be evenly spread across all nodes of the Kubernetes cluster. If you have all your pods running on the same node, and this node dies, this will kill all your pods. Specifying a pod anti-affinity for your deployments ensures that Kubernetes schedules your pods across all nodes.
A good practice is to specify a podAntiAffinity on the hostname of the node.
4.3 Pod disruption budget (PDB)
In Kubernetes, pods have a limited lifespan and can be terminated at any time. This phenomenon is called a “disruption”.
Disruptions can either be voluntary or involuntary. Involuntary disruptions means, as its name suggests, that it wasn’t something anyone could expect (a hardware failure for example). Voluntary disruptions are initiated by someone or something, like the upgrade of a node, a new deployment, etc.
Defining a “Pod Disruption Budget” helps Kubernetes manage your pods when a voluntary disruption happens. Kubernetes will try to ensure that enough that match a given selector are remains available at the same time. Specifying a PDB improves the availability of your services.
4.4 Use Namespaces and Labels [3]
Distinctly define and structure Namespaces in Kubernetes clusters and label your Pods for long-term maintainability. Namespaces are essentially a virtual cluster inside your Kube cluster, which are each logically isolated from one another.
We find it’s much easier to apply security controls such as Network Policies when different types of workloads are deployed in separate namespaces.
Also Limit Range feature (https://kubernetes.io/docs/concepts/policy/limit-range/) can be used, it can restrict the resource consumption and creation on a namespace.
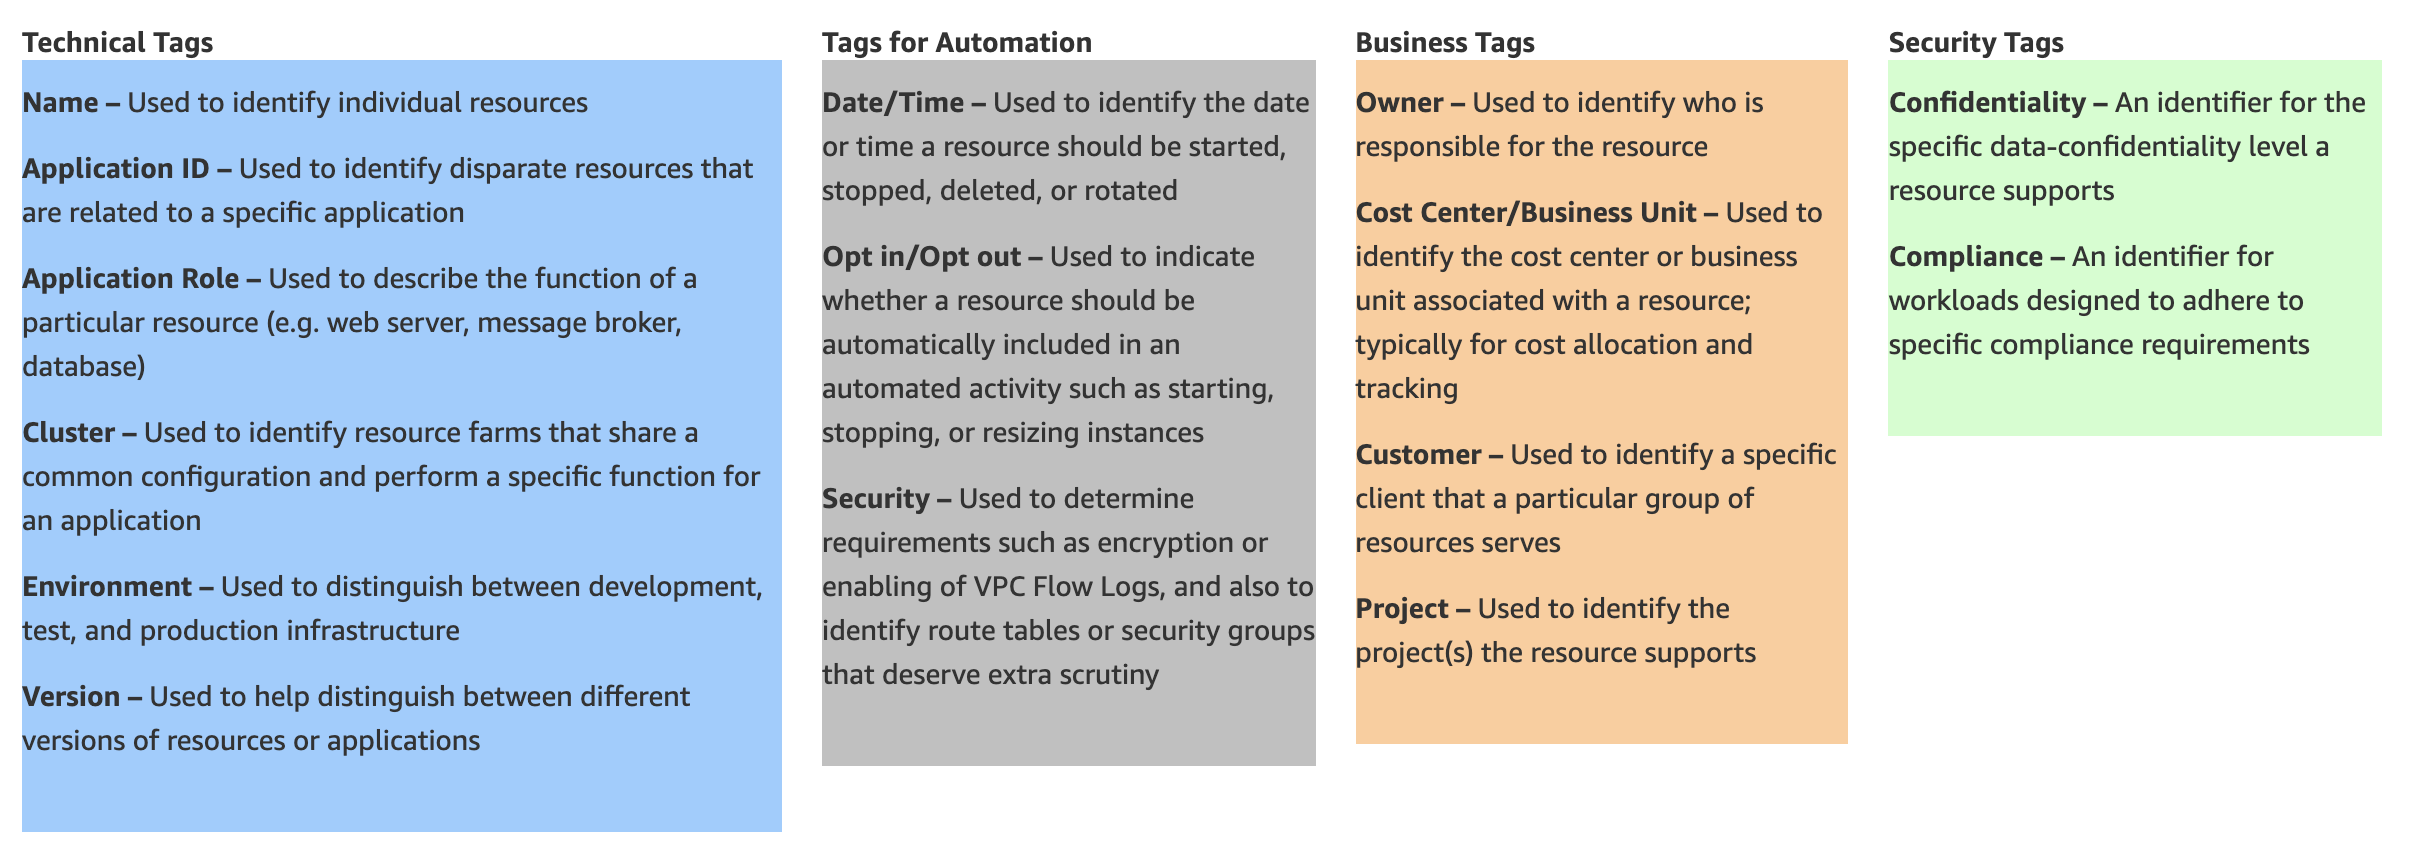
Labels help organize and select (or deselect) subsets of objects as necessary. Outlining a good label policy (one that clearly defines the use case of your object—Pods in this instance) and being disciplined about sticking to it will save you time, energy, and a lot of headaches in the long run.
According to the official kubernetes documentation (https://kubernetes.io/docs/concepts/overview/working-with-objects/common-labels/), these are the Kubernetes tagging best practices:
4.5 Network policies [9]
There are 4 distinct networking problems to address:
- Highly-coupled container-to-container communications: this is solved by pods and
localhostcommunications. - Pod-to-Pod communications: this is the primary focus of this section.
- Pod-to-Service communications: this is covered by services.
- External-to-Service communications: this is covered by services.
On AKS you can decide, before cluster creation, which way to use to implement network policy:
- Azure’s own implementation, called Azure Network Policies.
- Calico Network Policies, an open-source network and network security solution founded by Tigera.
Full doc here -> https://kubernetes.io/docs/concepts/cluster-administration/networking/
Network policy example.
apiVersion: networking.k8s.io/v1
kind: NetworkPolicy
metadata:
  name: test-network-policy
  namespace: default
spec:
  podSelector:
    matchLabels:
      role: db
  policyTypes:
  - Ingress
  - Egress
  ingress:
  - from:
    - ipBlock:
        cidr: 172.17.0.0/16
        except:
        - 172.17.1.0/24
    - namespaceSelector:
        matchLabels:
          project: myproject
    - podSelector:
        matchLabels:
          role: frontend
    ports:
    - protocol: TCP
      port: 6379
  egress:
  - to:
    - ipBlock:
        cidr: 10.0.0.0/24
    ports:
    - protocol: TCP
      port: 5978
5. References
- Smarter with Gartner, 6 Best Practices for Creating a Container Platform Strategy, April 23, 2019, www.gartner.com/smarterwithgartner/6-best-practices-for-creating-a-container-platform-strategy/
- https://blog.algolia.com/8-algolia-tested-best-practices-kubernetes/
- https://caylent.com/best-practices-kubernetes-pods#
- https://www.cncf.io/blog/2019/01/14/9-kubernetes-security-best-practices-everyone-must-follow/
- https://blog.sqreen.com/kubernetes-security-best-practices/
- https://blog.sqreen.com/kubernetes-security-best-practices/
- https://rancher.com/blog/2019/2019-01-17-101-more-kubernetes-security-best-practices/
- https://docs.microsoft.com/bs-latn-ba/Azure/aks/upgrade-cluster
- https://kubernetes.io/docs/concepts/cluster-administration/networking/
What's next?
CI/CD, Canary release, rollout update..

![[k8s] Automatically pull images from GitLab container registry without change the tag](/content/images/size/w750/2024/01/urunner-gitlab.png)